Drawing in Pencil for the Joy of It

A few months ago I started this pencil drawing, simply for the joy of drawing (and to prove to my drawing students that I can draw). I worked from photos that I took in Mineral King last fall. The light, Audra’s hat, the lack of dealing with a face or an actual complete horse all caught my interest, along with the dynamics between the woman and the horse.

This horse was the last one to get loaded for transport down the hill. Audra was so patient, just waiting for this recalcitrant horse to follow her into the trailer. “Recalcitrant” because he spent most of the summer outside the corral with a couple of mules. The others just watched while staying in the boundaries. Then, sure enough, this guy was not interested in joining the herd to head down for the winter.

Because the hat seemed to be the most important part, I started with it. If I can’t get the most important part to look right, there’s no need to waste time on the rest of the picture.

I had a little bit of difficulty with some of the shapes, so I made corrections and showed those to my students to demonstrate how to repair problems (and to stay humble). But I didn’t photograph the corrections—they were for my drawing students to learn from. (Do you want lessons? I have a waiting list, and you are welcome to get on it!)

Drawing lessons were suspended in December, because that’s the way we roll. I was occupied with many things, some work-related (painting, blogging, participating in a little bazaar, resupplying my vendors, filling calendar orders, sending Christmas cards to my students, sending out 2 newsletters—are you on that subscription list? —planning a solo show for Autumn 2024, ordering supplies, doing some year-end bookkeeping) and some non-work-related (you don’t need a list of this stuff).

As you have recently read here, I was a little flummoxed by how to proceed on several paintings, so I used the excuse that it was too cold to paint in the workshop and went into the studio to finish this drawing. (I love to draw in pencil—did you know that?)

Because I wasn’t showing my drawing students along the way, I didn’t photograph or scan any of the rest of the steps.

Here it is almost complete. “Almost”?? Yeppers, because when I scan it, the white paper scans as gray, and the pencil has a brownish cast.

This is unacceptable, so I use Photoshop Junior (actually Photoshop Elements) to erase the margins.

The drawing is simply titled “Audra”, not “A Girl and Her Horse” (she’s a grown woman and it ain’t her horse), not “Big Hat, No Cattle”(no cattle in Mineral King because it is National Park, not National Forest) or “Wranglers Are For Women Too”. . . wait, that one is pretty cute. Maybe it should be called “Wranglers Aren’t Just For Cowboys”.

Nah, the hat is more important.

A Pleasant Walk Through Exeter

A week or two ago, I had some time to kill in Exeter. (That is an unpleasant metaphor—forgive me!)

So, I went for a walk. We think we know a place because we drive through it, but walking is the best way to really take in our surroundings. It’s also a good way to find new ideas for drawing or painting. These aren’t necessarily subjects that will sell, but they will be useful to my drawing students who are learning to accurately see shapes, proportions, perspective, values (darks and lights), and textures.

First, I passed a park that someone once told me was called “Spit & Whittle”. However, there were no benches for old guys to sit on, so maybe I had the wrong park. However, I saw this curious structure, imminently drawable in my view.

I walked along a basic neighborhood street. The yards all had little lawns in front, some green, some unwatered, and only one lawn-parker. I wanted to relandscape, but no one requested my opinion. So, I just admired the view of Rocky Hill.

And of course there were some trains. Exeter is a little catty-wompus on a map because it was built around railroads, which follow the shortest route rather than an exact N-S-E-W grid.

From downtown, there is a view of Alta Peak. There are also American flags, Christmas decorations, fall color in some trees, and markers in the middle of the street, warning against parking on an upcoming evening because of the Christmas parade.

Then I felt compelled to visit the building where my studio used to be. I paid for that brick step, so sometimes I like to just visit it.

It was a real privilege to be located in the building of the poppy mural.

And sometimes I miss being there in the heart of such a great little town, sharing space with a terrific gift shop (Rosemary & Thyme), enjoying the patio outside.

On my way to retrieve the pick-’em-up truck with its new tires, I passed this building. The details on older buildings are so charming, and always strike me as good subjects to practice drawing or painting. Bricks aren’t easy, nor is shrubbery but when one is learning to draw, it’s all hard.

Then it was time to go to the Courthouse Gallery CACHE to teach the final drawing lessons of 2023.

I love to teach people how to draw, love my drawing students, love this location in this little town that I also love.

Aw shucks, isn’t that just sweet?

And remember tomorrow, the little holiday gift bazaar at CACHE, from 10-4.

A Trip to Oregon, Chapter 3


The day before I left Oregon I had an opportunity to draw with some precious little people. Because this is the world wide web, there will be no photos of those folks. We drew together on two different occasions, but I only thought to take a very few photos on the second session.

Before we began drawing together, one of them sent me this picture, full of eagerness and excitement.

She had a mind for drawing like a great big sponge. We discussed things like outlines, leaving paper color for the brightest item in the drawing, and putting on paper exactly what you see. Then we picked a daisy outside, brought it in, and began drawing from real life. Pretty radical change, eh?

One of these precious little people has a real thing for dinosaurs. He drew one for me, then we discussed ways to make the back legs look as if they were in the back. His birthday was soon, so when his attention span was reached, I drew a dinosaur for him. I didn’t photograph the final version because it included a birthday message, and I protect my little people’s privacy from the world wide web.

This little guy drew a house for me, and then we went outside and I showed him how to draw his grandparents’ house by looking at it. He traced my version, then redrew it on his own.

Another little person learned to draw a football player with a normal sized neck instead of as a pencil-necked-geek.

It was oh so very fun that I didn’t take many photos. . . so absorbed in our tasks that I just forgot about documenting things.

There was also an experiment taking place throughout the day, involving more daisies.

Did you ever put celery in a jar of water with red food dye? Flowers are more fun.

We would check the progress periodically. These three precious little people kept experimenting by moving their daisies into different dyes throughout the day.

All good things (nay, all things, whether good or bad) come to an end. My trip was almost over. With those drawing lessons, I suppose it could have been considered a business trip, but alas, only Fernando gets his miles written off, and he was unable to participate in our adventure.  

Two Drawings, Mine and Someone Else’s

Hers

A drawing student brought in a photo she had taken, a challenging choice for a beginner. I tell my students, “Pick something you love, because you will be looking at it for a long time”. She loves this scene and worked very diligently. 

This is the result of her labors, and I think she did a wonderful job! (I removed her name because she didn’t ask to be on the World Wide Web, and I didn’t ask her permission.)

This is how it looks after I’ve photoshopped it for reproduction purposes, in case my student wants to have copies or cards printed.

Mine

For about five years, I have been working with a writer on a book about tuberculosis. It began as a local story about the TB hospital in Springville (here in Tulare County). When he started researching, the story grew into a different book, a massive project. Through it I have learned much more than I ever expected about “the white plague”, as opposed to “the black plague” (both of which refer to skin color associated with the disease, not race, so no need to get your knickers in a twist.)

The author came to me initially for some drawings for the Springville book, and upon further discussion, hired me to edit for him. We are finally reaching the end of the main text and are now gathering appropriate illustrations.

He couldn’t find a good photo of Virginia Poe (wife of Edgar), so he asked me to draw her from a rather gruesome photo (or painting?) taken shortly after she assumed room temperature.

Are you properly horrified? This fits with Edgar Allan Poe’s writings, doesn’t it? I haven’t read his work, but I learned plenty about him through the process of assisting with the writing of this book. I’ll stick with modern writers for my fiction.

Meanwhile, I think the background needs a little bit more work.

Okay, all better now. I also remembered to sign the drawing. 


How to Draw with Graphite and Colored Pencils, Ch. 5

Today you will see what a piece of cake it is to add color to a little part of a pencil drawing. Since you have slept since I showed you how to complete the graphite pencil part, here it is again. The right edge is gray because either the scanner is lying about having a 12″ bed or the paper is lying about being 12″. 

ADDING COLOR: A decision about which set of colored pencils to use

The first step was to decide which set of colored pencils to use. Because nobody cares if I match the shade of red exactlY, I chose the simplest, easiest to use set of twelve: Blackwing Colors. 

On my laptop, I enlarged the photo so that I could study the darks and lights in the chair.

Darkest colors first: brown

My method of using color (and graphite) is to put down the darkest colors first. Because someone somewhere sometime chewed me out for using black (Pray tell, Mr. Chew-Out, why is black manufactured if its use is forbidden?), I started with brown. Using a sharp point and a light touch, with tiny motions in order to get it into all the cracks and crevices of the cratery paper, I put brown everywhere that seemed right.

Purple

Next, I added purple over the top of the brown, and put it in new places that seemed to want it. This might sound like mysterious gobbledygook, but if we were sitting together, I would point out which of those places need which color and why. However, I have other projects ahead. So, trust your instinct when you work on your own picture, because after all, it’s only paper!

Red

Now it is time for red. I covered over the brown and purple, and put red on the places that appeared to be solidly red without those other colors dulling or darkening it. This time I did more layers, because those other colors do make me wonder if I have wrecked the less red places. Even with experience, an artist can be full of doubt, because every project is brand new. I do much of this sort of thing under my magnifier in order to not cross over the lines and to try to fill in the dips a little better. I’ve never been this old before,  so I am relying more and more on my giant magnifying glass with a light bulb attached.

Pink

For the light red places, instead of trying to make my red pencil be less red, I chose pink. Why Blackwing considers pink to be one of the 12 basic colors is a mystery to me, but instead of trying to solve it, I just go with it.

More Red

Finally, I covered everything again with red, including the pink parts, changing pressure and amount of layering with how dark or light the photo showed. If I was really getting into the minutia here, I’d probably sharpen my pencil even more and work under the magnifier to really fill in those tiny craters. But as a cowboy once said to his fence builders, “This ain’t no piany yer buildin’”.

FINISHED!

In studying the metal chair legs, I decided that regular graphite pencil would do just fine. Again, I worked under the magnifer, sharpening the edges of the chair, adding a bit of darkness to indicate more shadow behind the chair and to separate the colored portion from the graphite, and generally just tidying up the whole little area. The shiny parts of the metal legs are plain paper, no pencil at all.

As I scanned the entire piece a final time, I realized that my scanner settings were still darker than normal for a pencil drawing. This final photo is the way it is supposed to be, complete with eensy little signature (done under the magnifier, of course.)

And thus we conclude my first tutorial, How to Draw With Graphite and Colored Pencils.

How to Draw With Graphite and Colored Pencils, Ch. 4

Conclusion of the graphite portion of the pencil drawing

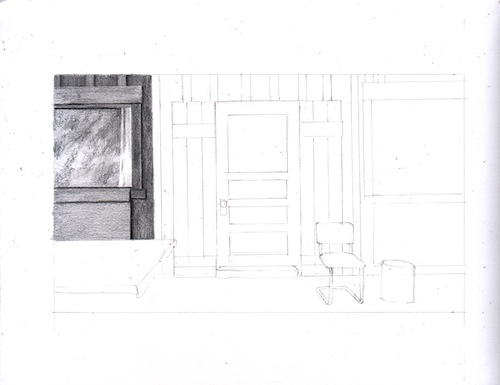
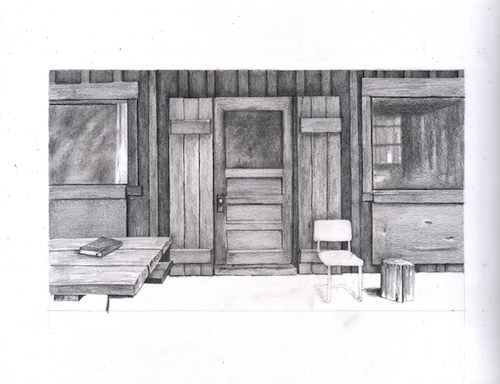
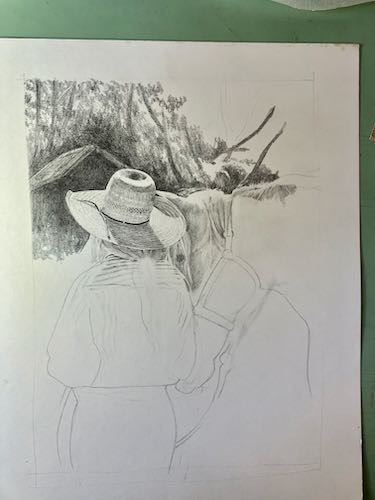
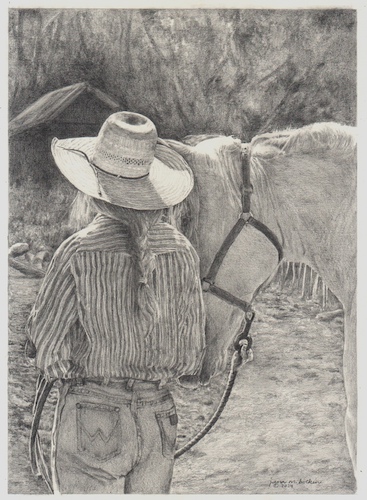
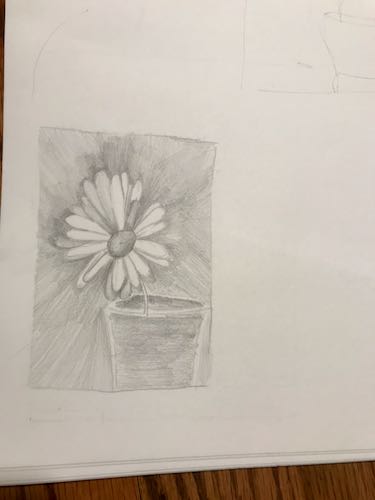
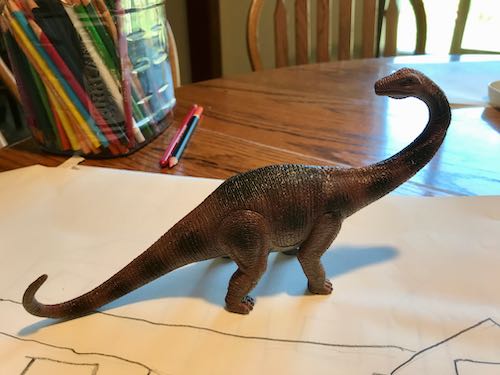
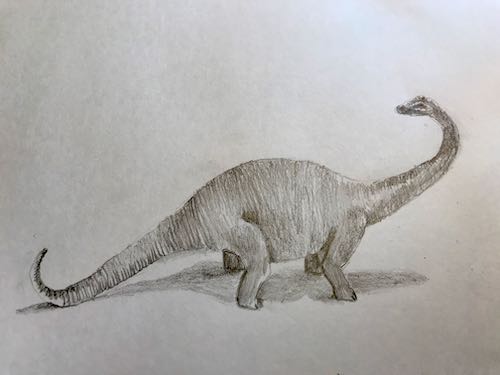
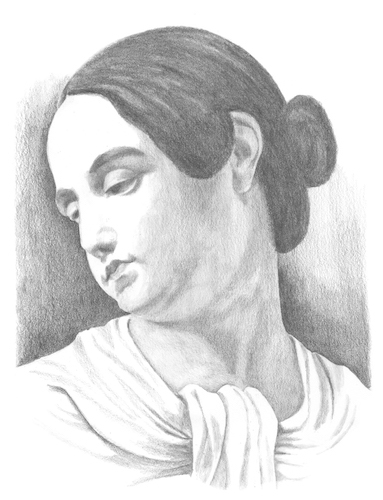
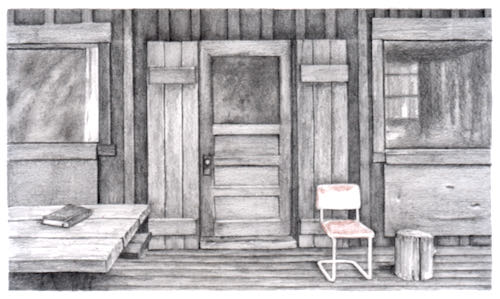
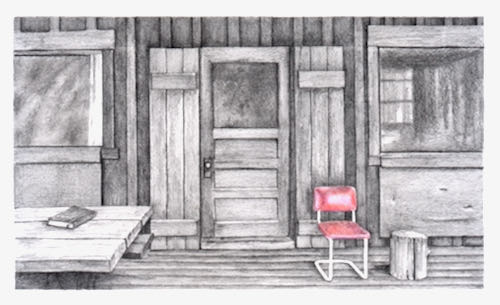
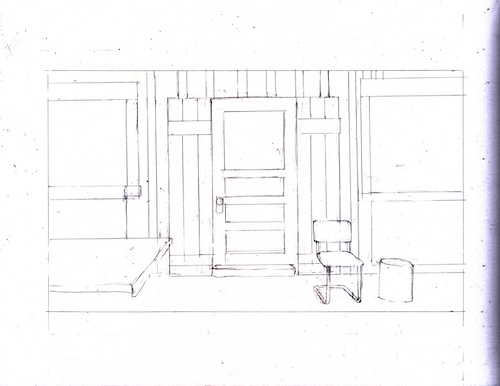
Today we will conclude the graphite part of the drawing tutorial. Tomorrow I will take you on a walk, or a cruise around the yard, or something to give your overworked minds a break from the minutia of pencil drawing. If you haven’t unsubscribed by Monday, you will see the steps of adding color to the drawing, last seen looking like this:

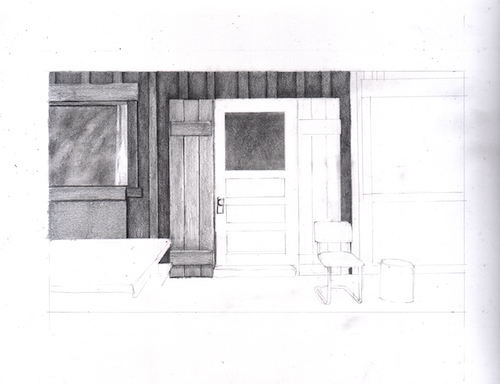
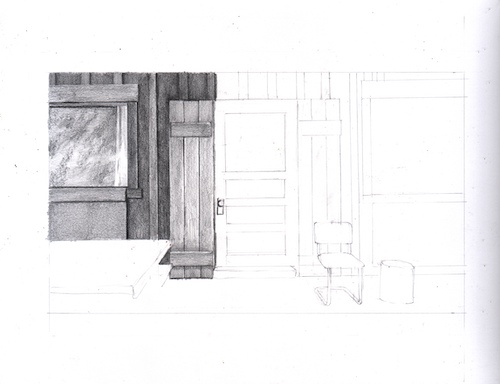
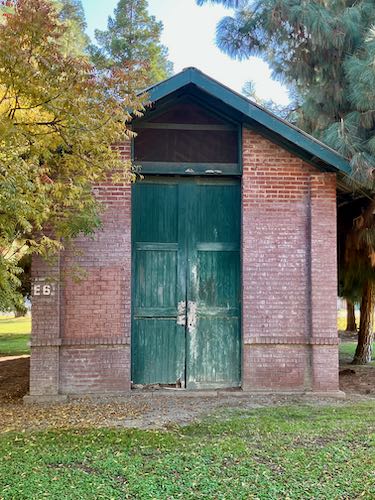
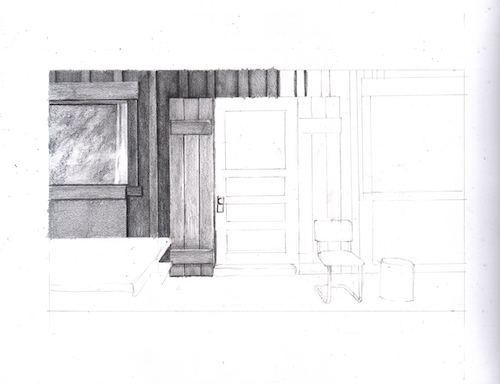
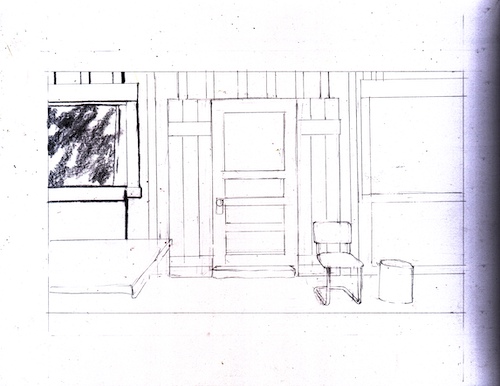
Step twelve: It is time to make a decision about the door and the shutters. In the photo, they are green and brown, and these shades are the same value (the same shade of gray if we turn the photo to black and white). I decided that the brown would be darker than the green when I did the shutter on the left. Now I want to be consistent with the green door and other green shutter, deciding which is darker and where it is darker, but in general, keeping the green lighter than all the brown. The way I do this is to only use 2B instead of 4B in the darkest cracks and for the darker edges, and do the bulk of the shading with HB. As I worked on the shutters and the door, the chair got smeary. I keep erasing it and cleaning its edges because it needs to be clean paper in order to take the colored pencil well later.

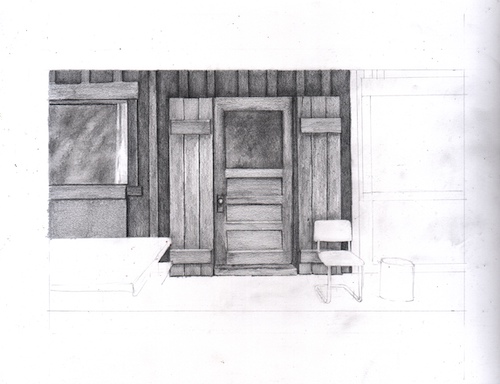
NOTES ABOUT FIXING AS YOU GO: As I shade, I find layout lines that need to be adjusted or erased. So, I take care of those as I find them while I am inching across the drawing.

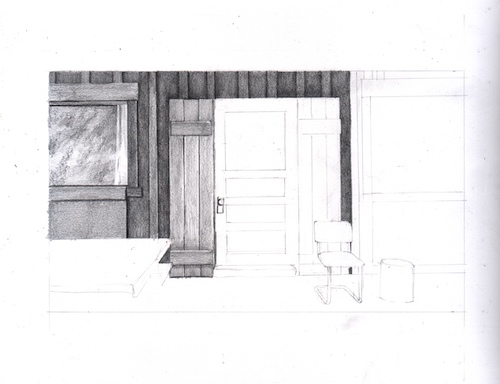
Step thirteen: Moving across the rest of the scene, I am ignoring the picnic table because it seems like a giant So What, unless I figure out how to put a place setting, a mug, a book, a something on it. I allowed stroke marks show on some of the wood, always going with the direction and appropriate length of the wood grain. In this window, I started with 4B, added 2B, and finished off with B, leaving a few places without pencil. Then I used the tortillon to smooth it. This time I left a little bit of paper color and also sort of followed the shapes that appeared in the photo for a hint of what is inside the cabin. After blending it with the tortillon, I added HB to the darker places to make them even darker.

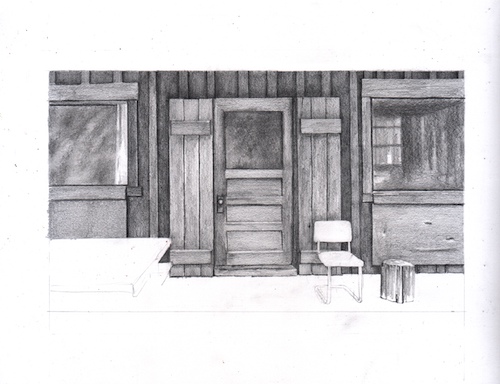
Step fourteen: A book on the table, but some confusion about what is beneath the table structurally. So, I will skip this for a bit and move next to the floor of the porch instead. Sometimes procrastinating gives my brain an opportunity to find a solution.

NOTES ABOUT CONFUSION: Even when working from one’s own photo, there are always areas of blurriness or seemingly irrelevant information. In spite of using a photo, some things just don’t make sense, so we have to make up things, cover them with darkness, or grow a shrub over the top.

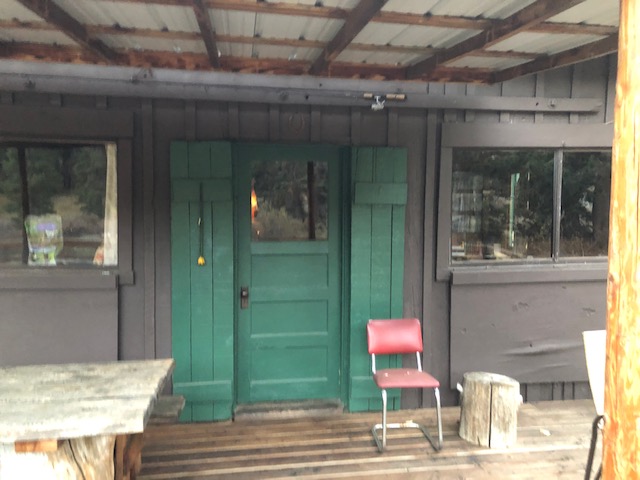
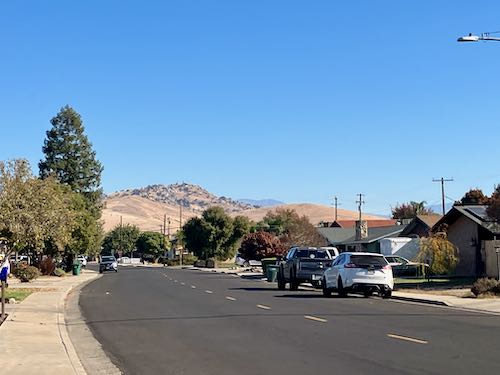
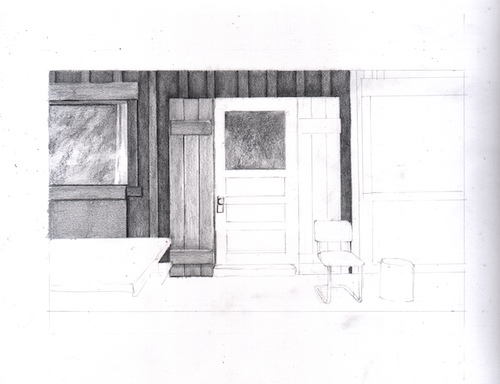
Step fifteen: Because I have changed the perspective on this picture, the floor boards will be parallel to the horizontal edge of the drawing. Here is the photo again so you can see the how they slope upward to the right:

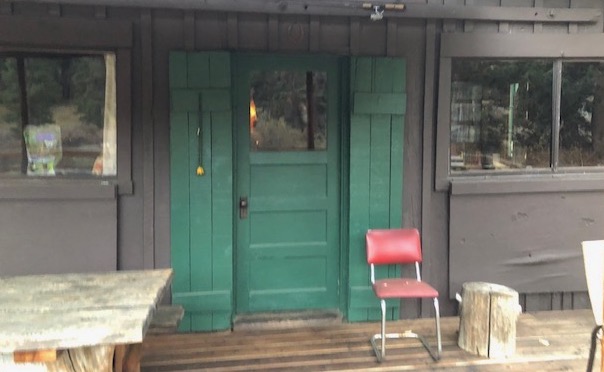
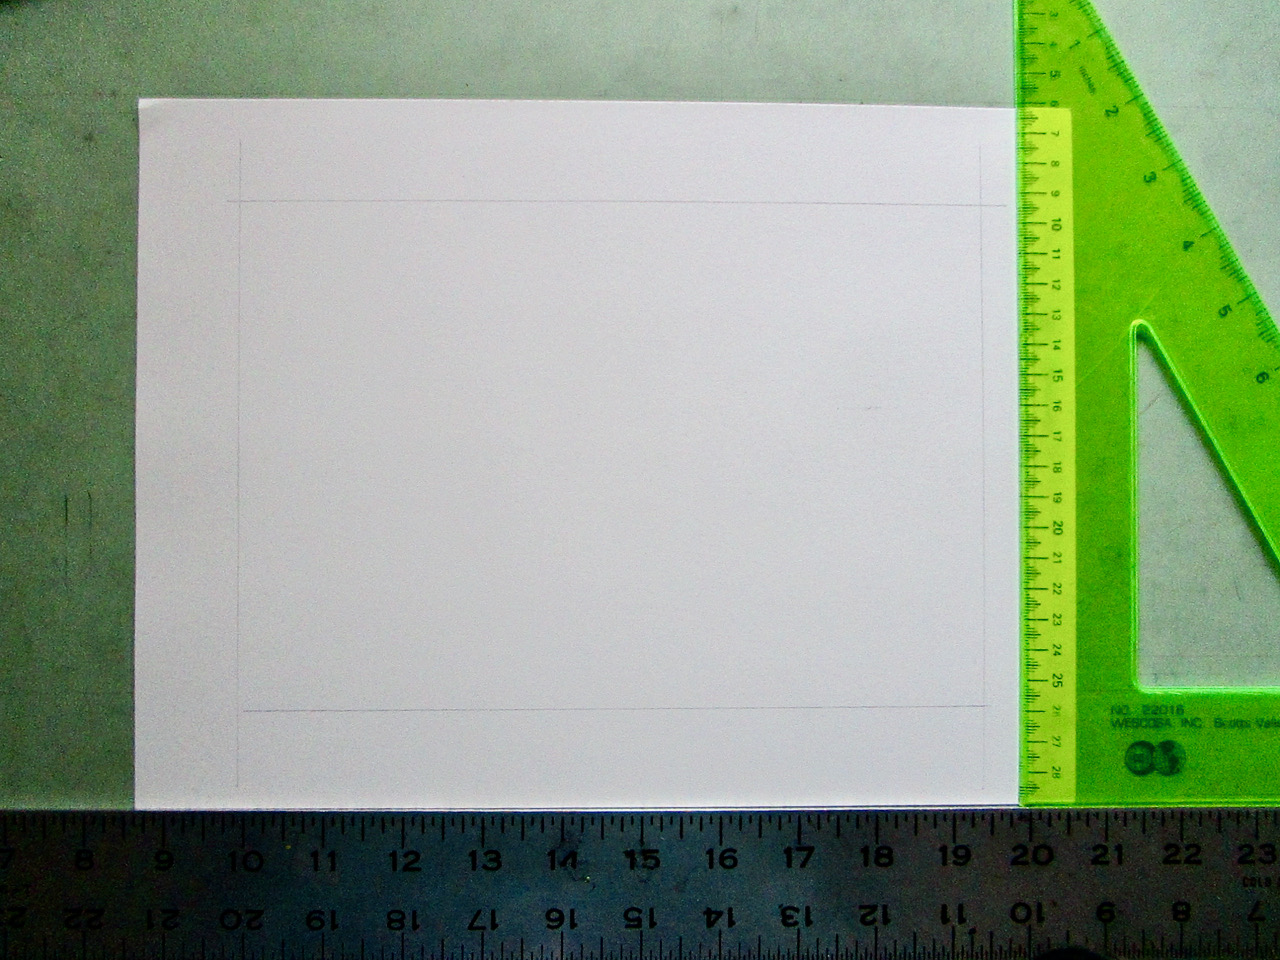
This is easy to do using my T-square, and I will guess the distances between the boards, simply eyeballing it and figure that closies count here (like horseshoes and hand grenades). Although I drew the lines using a straight edge, these boards are old and worn, so as I shade using a B, HB, and 2H, I made them a bit rough along the edges.

As I worked on the boards, my hand would have been resting on some of the completed parts of the drawing, so I put a piece of paper down to rest my hand on.

Step sixteen: All that is left to shade in pencil is the mysterious lower left corner. First, I looked at the uncropped photo to see if anything helped to explain the blobs: hmmm, some sort of legs. I could either make it all super dark (In which case I am telling my viewers, “Sorry, it was all in shadow, can’t be helped!”) or copy the blobs as I see them. This is the sort of problem that occurs when working with a photo one hasn’t taken oneself. Ahem. I think I did take this photo (unless Tracy or Dan did —thank you!), and I have actually sat at that table. But I have slept since then. . . End of excuses. I just picked up a 2B and started shading exactly what I saw, because unless it is really weird and distracting, nobody will notice or care.

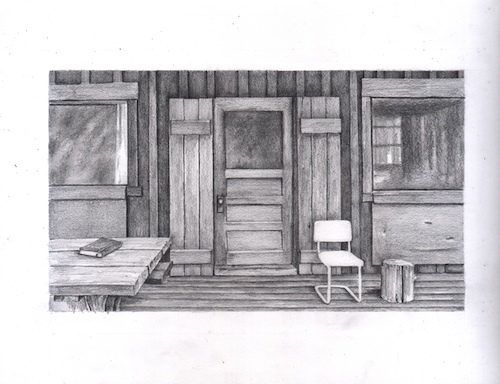
Step seventeen: that lower left corner looked ugly. The bottom left corner was very light on the photo, and that didn’t look right either. So I just darkened the whole mess, burying it in 4B. And honestly, I was losing focus after drawing, scanning, and writing about it for 5 hours, so I just might have been getting careless and sloppy.

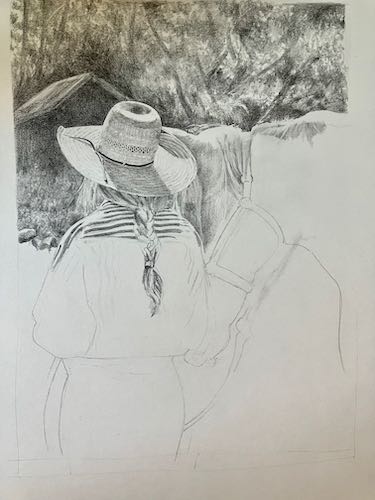
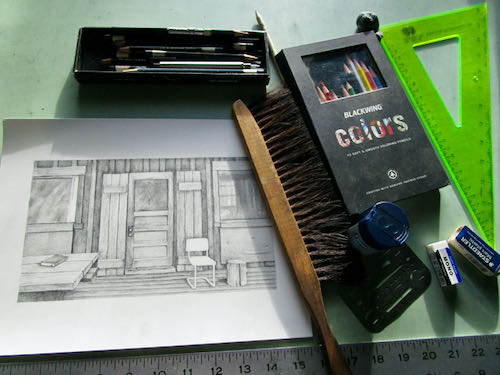
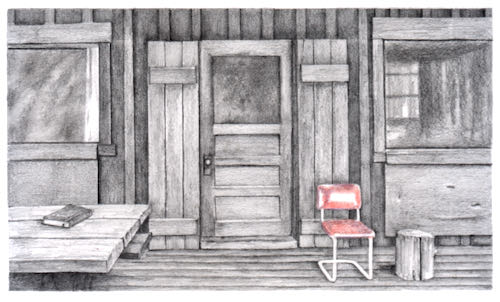
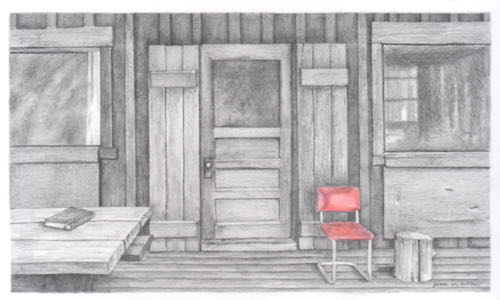
The final steps of the graphite portion of the drawing: erasing the margins, making sure there was zero pencil on the chair, looking at everything under that giant magnifying glass on my drawing table*, and then spray-fixing it with Blair Matte Spray Fix. This means (in theory, but sometimes not in reality and I don’t know why not) that you can still draw on the piece but nothing will either smear or erase. Yes, the spray stinks.

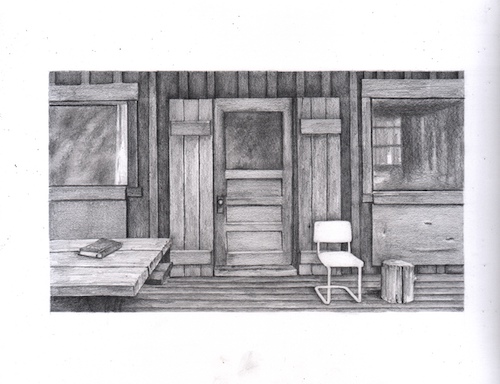
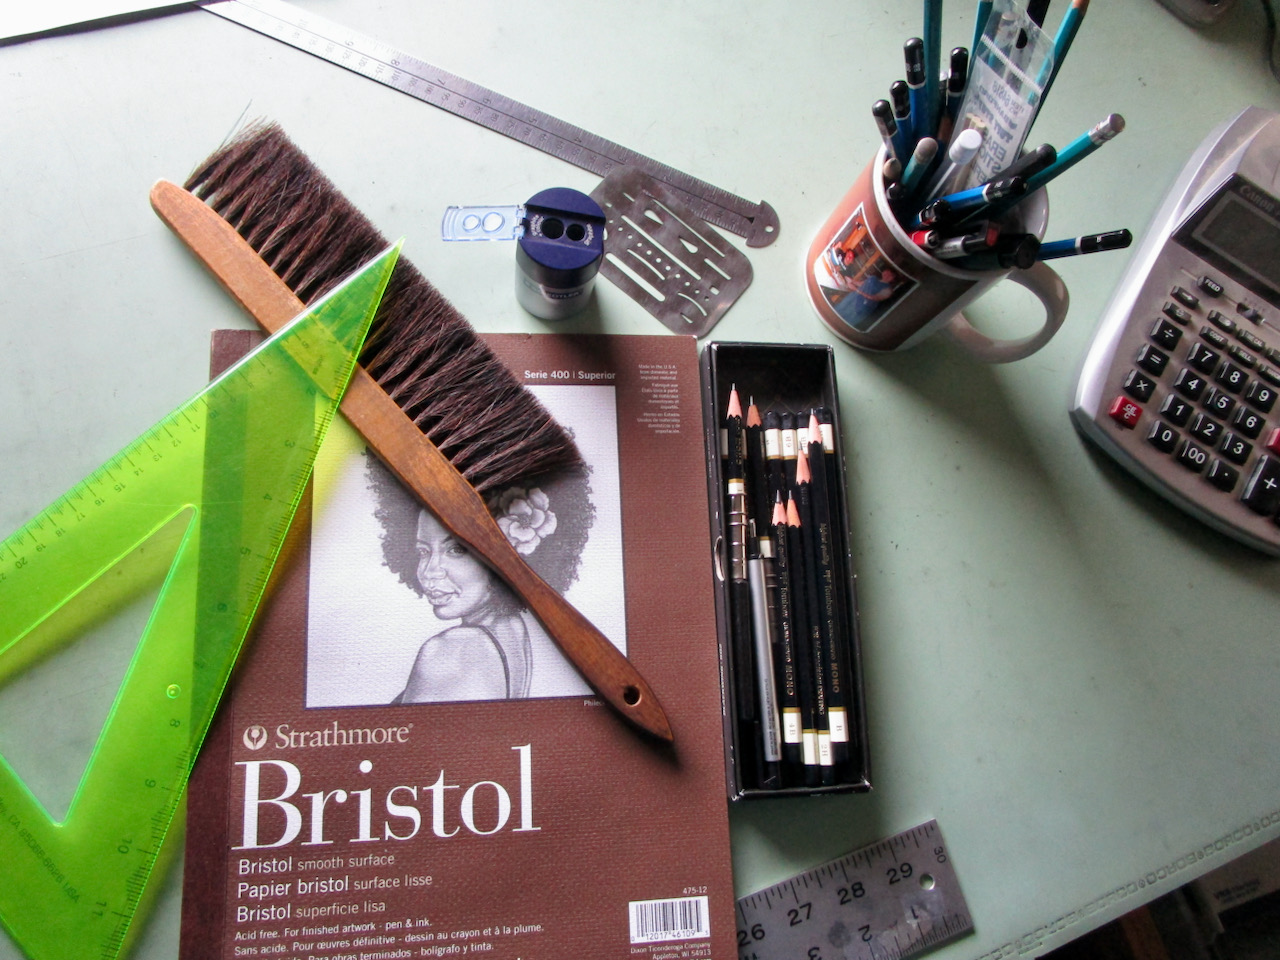
HOLY GUACAMOLE! I did this entire drawing without knowing where my real eraser is. I used the kneadable and the Tombow Mono Zero, a tiny eraser in a pen-like holder. It is best to be sure there are no pens lying around to be grabbed by accident when you use one of these—one of my drawing students did that once. Still, I sure would like to know where my Staedtler Mars white plastic eraser is hiding.

Oh for Pete’s sake. As soon as I unwrapped the stubborn cellophane off a new eraser, I looked in another pencil mug on the drawing table, and there was my old eraser. Were there trolls messing around in my studio over Christmas??

Next, we will add color. Nope, I don’t have a mouse in my pocket. This is the royal we speaking.

*See the giant magnifying glass? Also, note the mug of tea. NEVER do this. 
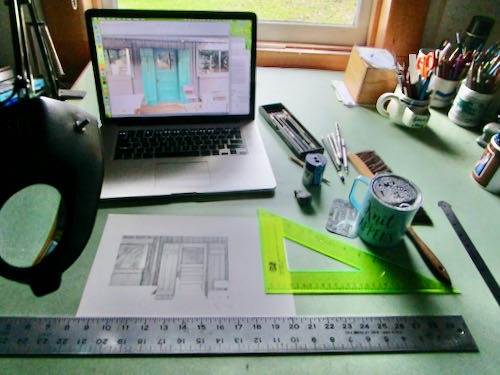
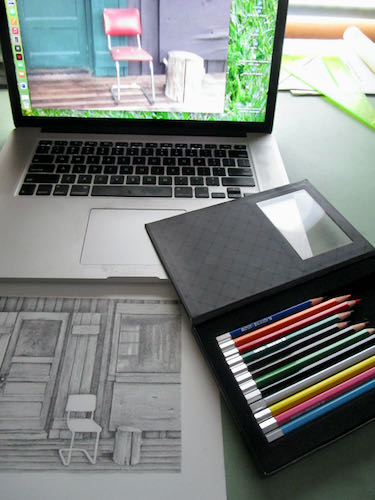
How to Draw With Graphite and Colored Pencils, Ch. 3

Today we continue the tutorial that takes you step by step through drawing with pencil and eventually, colored pencil.

EDGES OR OUTLINES? Real life has edges; coloring books and cartoons have outlines.  Rather than separate items with a black line, use different shades of gray. It is a constant questioning: is this darker or lighter than the thing it touches? Sometimes it will change as you move through a particular area—within a particular item, it can be against something lighter in one place and something darker in another.

Step eight: Keep layering. I used 4B for the shadows of the battens above the door, and added 2B on top of the 4B and over the boards and battens. You can see that this little area isn’t as dark as its neighbor on the left.

Step nine: I continued on the upper board and batten section, and this time added HB on top so it matches the previous shaded areas. I also placed the erasing shield over the top of these parts and erased my jagged lines that went over the border.

MORE NOTES: There are many little finessing techniques that I do automatically and if I called them all out and scanned each one, it would be 2026 before you read this tutorial. A few of those techniques are (1) erasing little pieces that cross over into other territory; (2) darkening areas slightly in order to separate them from their neighbors; (3) ditto #2, but lightening, sometimes tapping gently with an eraser; (4) using a straight edge to clean up edges.

ANOTHER NOTE ABOUT TOOLS: With old buildings like cabins, I first use a straight edge to draw a line, but when shading, I do it freehand so there is a touch of wobble, which gives the look of age and wear (sort of like my face these days).

Step ten: The window started with some 4B, then 2B, then B (yep, a new pencil I hadn’t used yet) over all the glass. I am just pantsing this part because I think the photo has some unimportant specifics, and I’d rather put my efforts into the parts that matter, things that are identifiable.

NOTES ABOUT COLOR: When working from a colored photo, you have to decide which colors are darker and which are lighter. We don’t use black outlines in realistic drawing, so the different colors in real life are depicted by different degrees of darkness in a monochromatic drawing (single color, in this case gray) called “values” in Art Speak. I choose to work from colored photos instead of converting to black and white because it sharpens my ability to see the values; it also helps me know when 2 items of the same value are actually 2 separate items and not one indiscernible blob of gray.

Step eleven: I decided that the glass on the windows looks too fuzzy, grainy, textured, so I used a tool called a tortillon, which is sort of a paper “pencil”, to smear and blend things. A Q-tip, tissue, or your finger will also do the trick.

MORE NOTES ABOUT VALUES: When one item is on top of another item of the same color, the one behind will be slightly darker where the two meet. That’s the way to separate them without the dreaded outline. 

Tomorrow: chapter 4, in which we complete the graphite portion of the drawing.

How to Draw with Graphite and Colored Pencils, Ch. 2

Happy Birthday, Trail Guy!

Hello, my guinea pig friends! Today I continue testing out my tutorial writing skills. 

The Next Steps

Step five: Straighten out the lines. It is NOT “cheating” to use straight edges. If it took a tool to build the actual item, it most likely will take a tool to draw it accurately. There is quite a bit of erasing at this stage, and I use the erasing shield to remove the tiny lines that are wrong. I want my work to be clean and accurate, without hairy or double (or triple) sketchy lines.

ANTI-SMEAR TACTIC: When you erase, you make crumbs. If you flick them with your hand, you will smear. If you blow, you might spit. (Yes, spit happens). Use a drafting brush, a soft paint brush, an antique shaving brush, whatever you have.

Step six: start shading. Shading is the fun part, the party! It is when things come alive with textures and depth. Because I am right handed, I start on the left and the top. This keeps me from dragging my hand across the shaded parts and smearing it. 

I start with a 4B, using the side of the lead. The photo has lots of indiscernible blobs in the window, so I chose to just do some fuzzy sloping strokes, almost a painting technique. Keep the pressure very light, because you can always add more, but it is a hassle to erase if you get too strong in the beginning. 
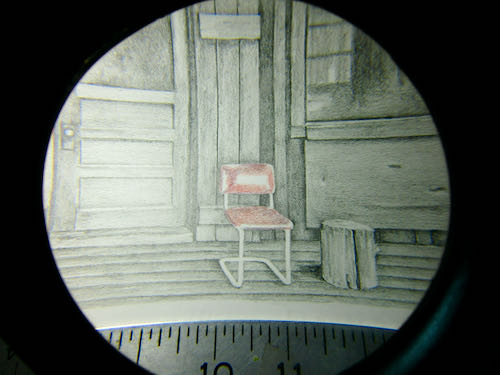
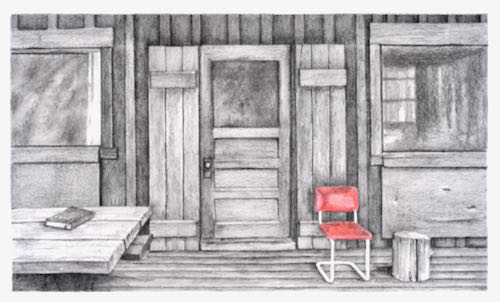
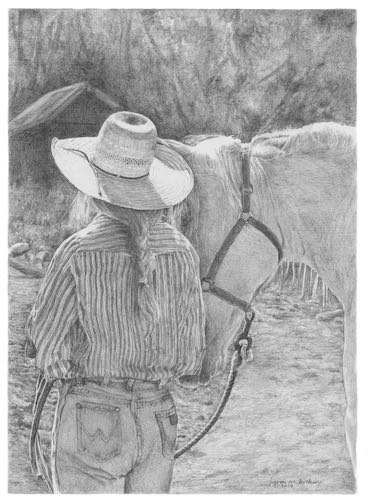
The scan looks much darker than the actual drawing because I want the texture to show.

PENCIL TALK: There is no industry standard, so the same pencils look different in different brands. “B” means black; “H” stands for hard. The higher the number with the B or H, the more of that particular quality. For example, 4B is blacker (and softer) than 2B; 6H is harder (and lighter) than 4H. HB is smack dab in the middle, and is the equivalent of a #2 pencil, which is a completely different pencil rating system.

Step seven: Continue layering. Over the 4B, I put 2B using the same type of strokes, and extended it to some new areas, then followed with HB layered on top of the previous layers, and ended with 2H, on top of the previous layers and on the rest of the glass on the window. I just kept layering, working on the glass and the wood surrounding it. I build my shades with many layers rather than pressure, and mostly use the side of the lead rather than the point. Then I come back with a point to sharpen the edges.

I think we will have about 2 more days of this tutorial, and then I’ll abruptly change topics so I don’t lose my readers who are bored with watching paint dry.


How to draw with graphite and colored pencils, Ch. 1

My colored pencil artist friend Carrie Lewis asked me to write a tutorial, showing the steps of completing a drawing with pencil and colored pencil. 

I said, “How do I do that?” 

She offered to type while I talk through the steps, but I realized we’d have to be on the phone for about 8 hours. 

So, I chose a photo, started drawing, photographing the steps, and writing about it. Well, yes, sort of, sort of not.

The first session was confusing. I took notes, was sure I’d remember what they meant in order to transcribe them later. 

I photographed a few things, and also scanned the drawing as I went along, but then it was tricky to figure out which order all the pictures went in. Then, I realized there is a lot of information that doesn’t fall in line with the steps.

I’ve decided to post the whole tutorial here on my blog, in 5 chapters. Maybe we can tighten it up together.

How to draw with pencils (and later, add some color) 

The first four steps

Step one: Choose your photo. I chose this because the red chair is a good candidate to be drawn in colored pencil, with everything else in graphite. You can just tint things at the end of a drawing or you can choose a specific item to do in full color. I prefer the latter method.

Step two: crop the photo. Beginners often feel chained to exactly what is in front of them. Over time and with experience, we learn what matters and what doesn’t, and eventually decide that we are the boss of our own artwork.

TOOLS: I use the items in the photo, working at a slanted drafting table. T-square, ruler (with picas so I don’t have to deal with fractions), drafting brush, erasing shield, calculator, pencil sharpener that catches its own crumbs, and Tombow pencils, from 4B to 2H, along with a couple of erasers that don’t show. I prefer the Mars white plastic, but seem to have lost mine. Because I began drawing so lightly, the kneadable eraser works, but it is too ugly to photograph. (It looks like gray chewed gum, gross.)

Step three: draw the borders, making a size that is proportional to the photo. Measure, use math, eyeball it—whatever works best for you. I measure and use tools. It is always best to have margins, so you don’t view the edge of your paper as the edge of your drawing. If you misjudge sizes while drawing, this will give your drawing room to grow. It also prevents a signing or framing problem, should you decide to get it framed. I draw the border with a sharp point on an HB, using a very light touch. I might want to move the border later, draw exactly up to it, or draw over it without it showing through.

Step four: Start figuring out where things are going to go. Look for the main items, in this case, the door and the chair. Draw very very lightly. My lines barely show, so I darkened the lines (just on the photo using my scanner) in order for you to see them.

DISCLAIMER: I chose to alter the picture, to appear as if we are looking straight on the scene rather than from an angle. In most pictures, vertical is always vertical. It is the horizontal surfaces and lines and edges that disappear off toward vanishing points. However, I decided to keep the horizontals and verticals all true to a straight on view rather than slightly angled, as the photo shows. THIS IS REALLY HARD TO DO WHEN YOU ARE STARTING OUT, so you will have less trouble if you just stick to the photo.

Tomorrow: the next steps.

Drawing on the Side

What does “drawing on the side” mean? Is that like salad dressing on the side?

In this case, it means that I have a pencil drawing in progress that I keep with my drawing lessons supplies. That way, if I get to lessons early or if no one shows up for class (REALLY?? Yeppers, it has happened), there is something I can work on instead of just knitting.

You thought what? That I would play on my phone? If you thought that, you don’t know me very well.

The back tree needs to be darker and there is a little patch of unfinished background.

No rush. It isn’t a commissioned pencil drawing. It is just a way to A. indulge my love of drawing, B. show my students a piece in progress, C. give them a chance to evaluate my work because we must tell one another the truth, and I want to know if they have been paying attention, D. be productive in otherwise empty time.