Drawing Buck

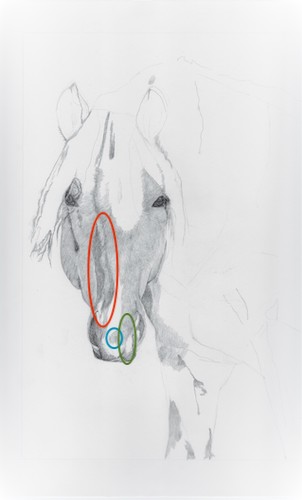
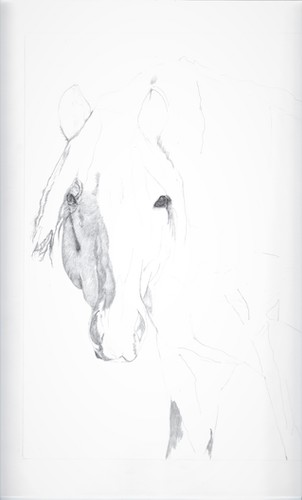
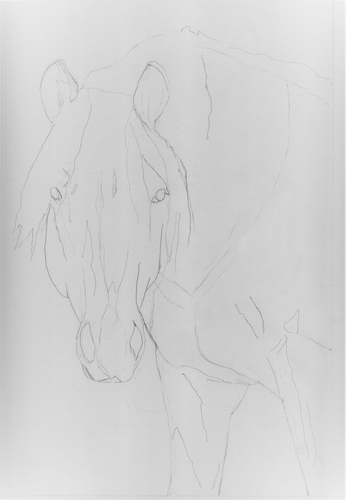
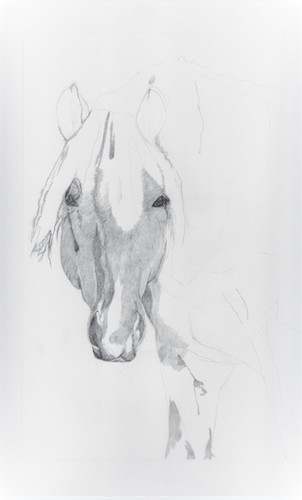
My drawing student C and I continue to work on her pencil drawing of the horse, Buck. This last time she took a photo of the drawing instead of scanning it. I tried to help and was able to show her how to put a lock of hair across the eye. She also asked me about her hair shading techniques, and after staring at it a bit, I finally concluded that it was all too squarified for me to tell what was pencil and what was pixel.

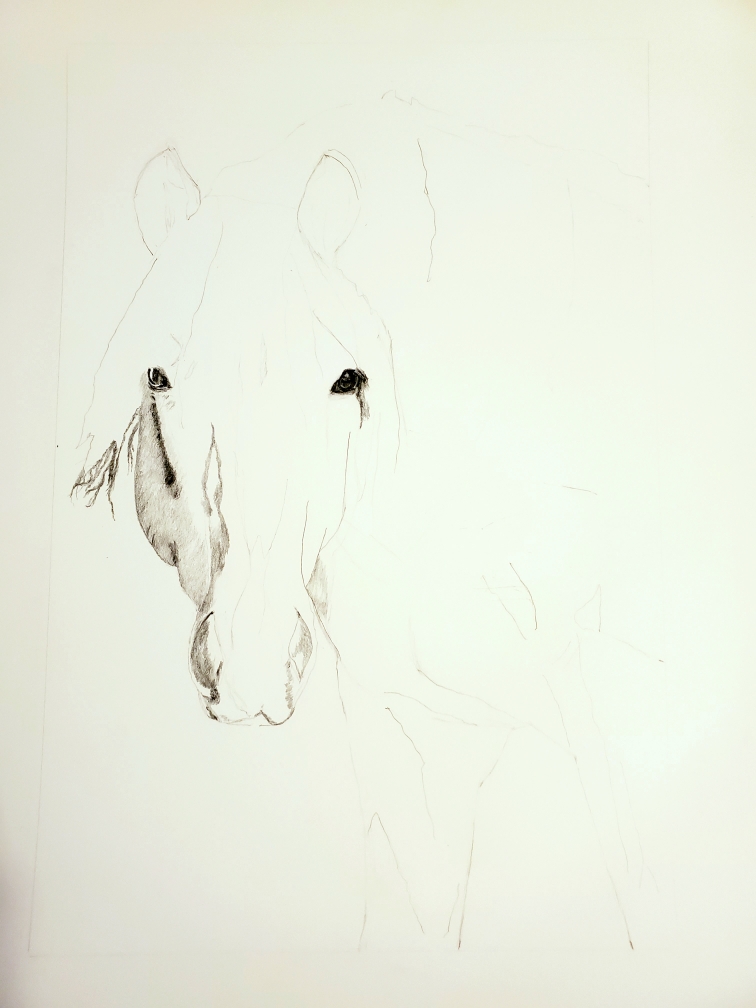
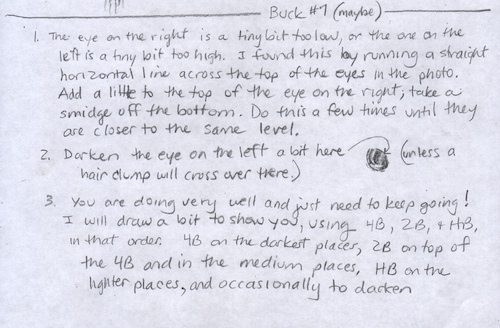
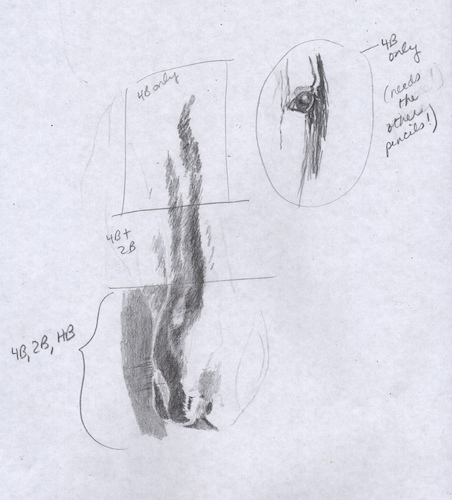
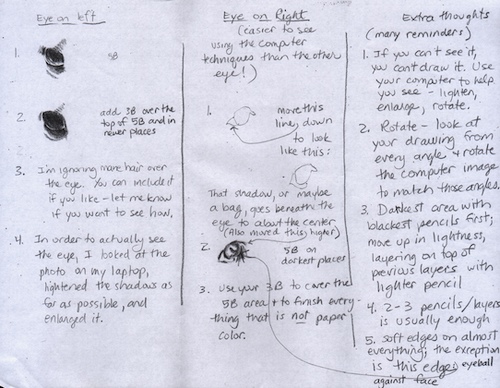
Here is what I told her in the email (because I think my writing is a little bit too sloppy):

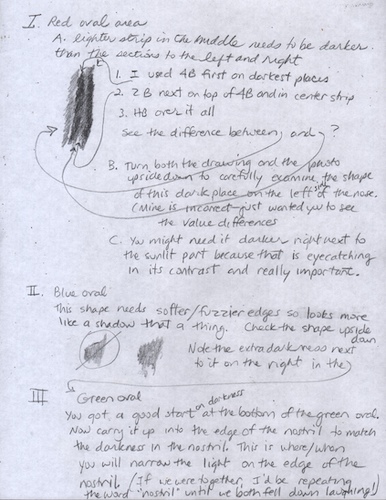
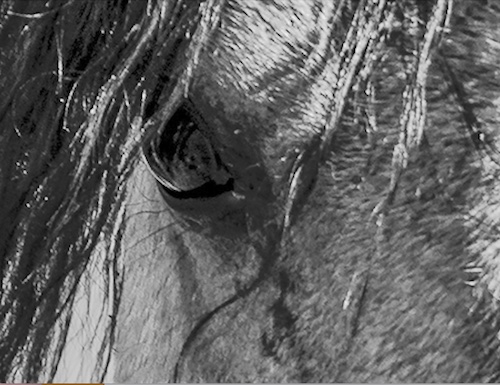
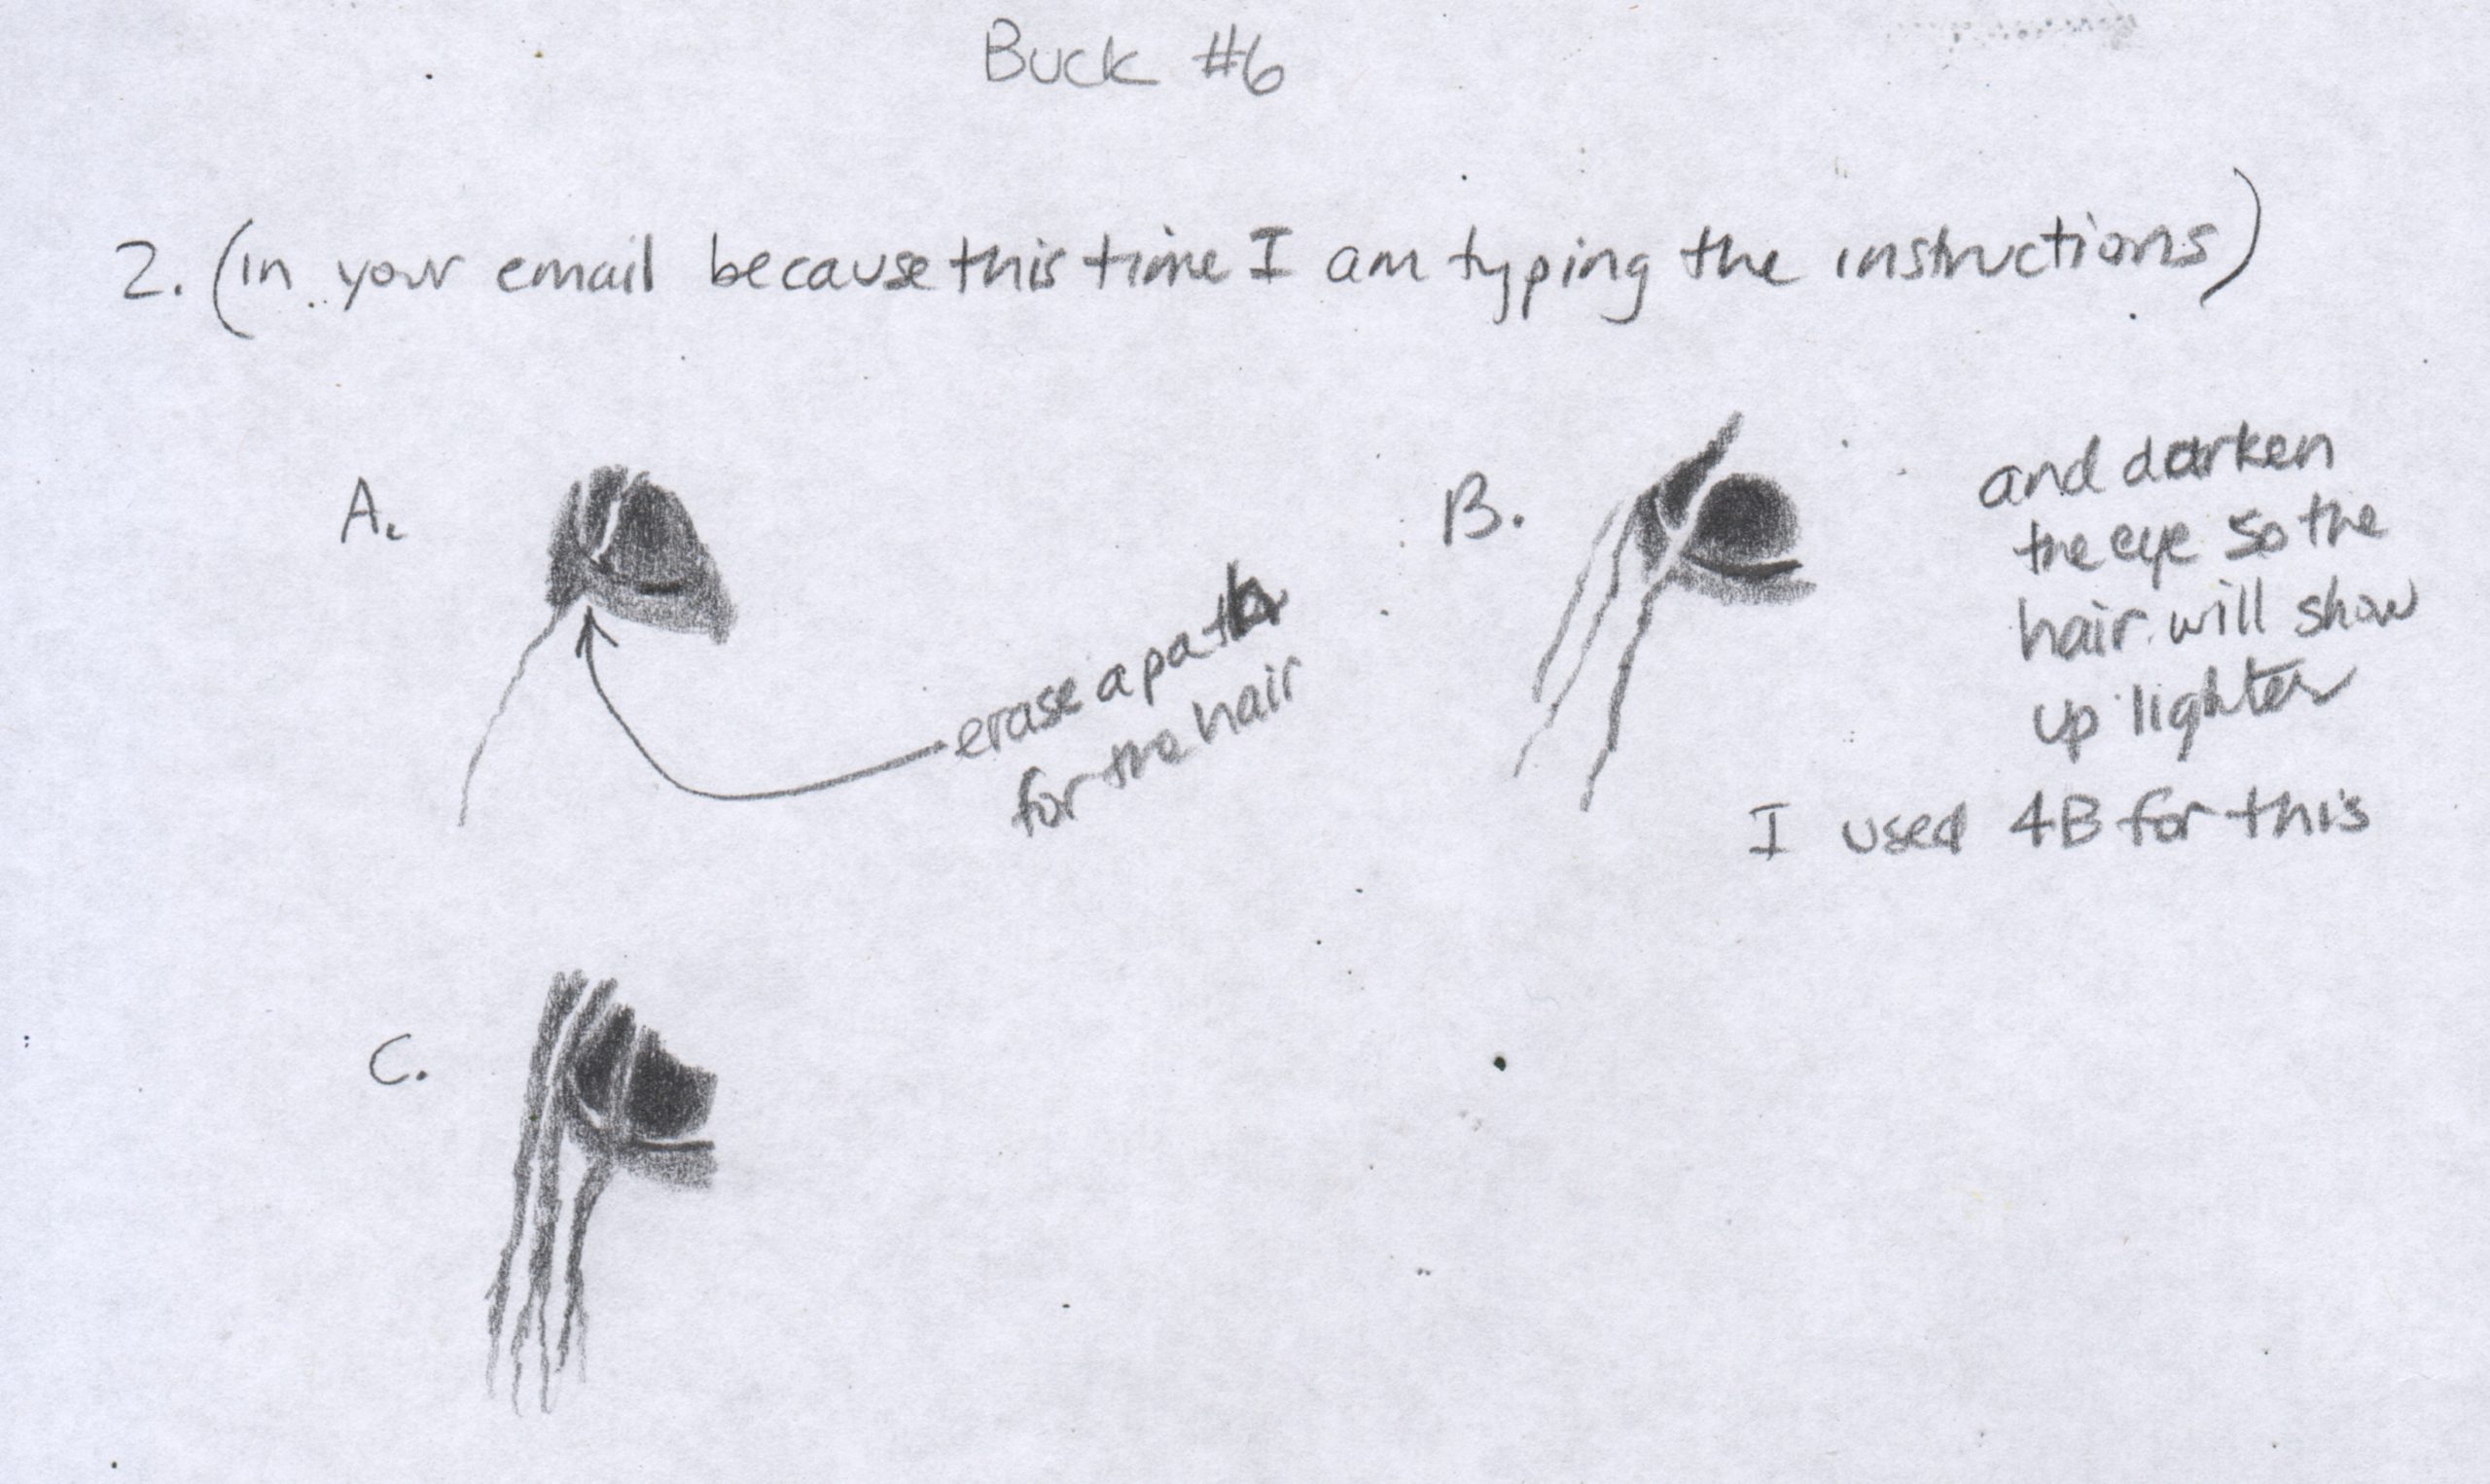
“About the hair crossing over the eye: The question to be answered is always: Which is darker? sometimes the only way to tell is to squint at the photo so the detail and color blur. Another way is to turn your photo to black and white, but this sort of feels like cheating. Well, not cheating, but bypassing the ability to learn to see values by letting the computer do the work. Often the black and white method backfires, because the 2 things are the same value (darkness). This means you get to decide (you are the boss of your picture.)
 
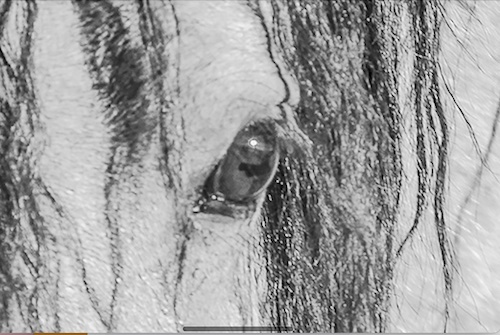
“The hair is darker in some places and lighter in others. Just make the adjustments to whatever is behind the little clumps so that it shows up. It is okay for the clumps to look broken or disconnected.
 
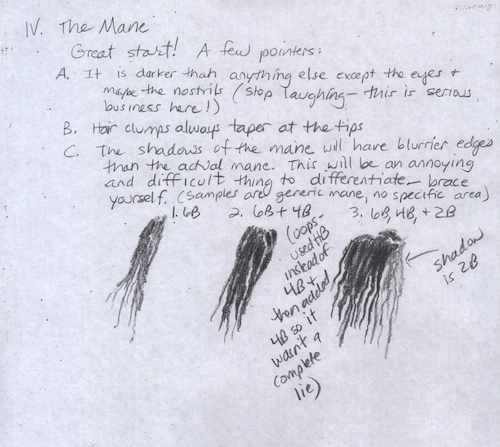
“Hair always tapers at the tips.
 
“I can’t help you on the shading; because of the pixelation, it is too hard to tell what you have actually done and what is getting squarified. 8-( 
 
“You can either keep going and then scan it, or you can rescan this and I can keep going here!”
 
So, this lesson is on hold for a bit.
My show “Still Here” is still there, at Arts Visalia, that is. The phone # to make an appointment to see it is 559-739-0905. Gallery hours are Wednesday through Saturday, noon-5:30. The last day to see my work there is Friday, April 30.


Custom Pencil Drawings

These are all examples from a whole lotta years at the drawing table. (Yes, I know — “a whole lot of”, but I also like to say “prolly” and “liberry” and “remorial building”).

I’ve been a long time admirer of this house and was thrilled when the owner asked me to draw it. I took many photos, looking for the best way to depict this gem.

This was a collection of favorite memories of a couple’s trip to Ireland, working from many photos that they provided. The challenge was how to put them all together.

The customer provided all the photos for these. I pushed back against the portrait; the customer said that a likeness wasn’t necessary. Good thing, because likenesses are impossible to guarantee, especially at this size.

I love to draw in pencil; however I also use…

…oil and murals to make art that people understand about places and things they love for prices that won’t scare them.

Anniversary Dogs

A thoughtful mom commissioned me to draw a pair of dogs for her daughter and son-in-law’s anniversary. She videotaped them opening the gift, and while I cannot put that on my blog, I can show you the dogs.

The daughter sent me this message: “Jana!!!!! I love love love the portraits of Charlie and Maggie!!!!! Thank you so much!!!! You captured their expressions brilliantly!” (I might have gotten the number of exclamation points wrong in the quote).

You are so welcome, K & F!! It was a pleasure, especially because we are friends AND because you stopped by the studio when it was on the table. It was in a folder, so I knew you wouldn’t notice it, but your mom was as nervous as a long-tailed cat in a room full of rocking chairs.

In case it has slipped your mind:

I use pencils, oil paint, and murals to make art you can understand of places and things (and sometimes pets) that you love at prices for won’t scare you.

New Virtual Drawing Lesson #2

Last week we saw the beginnings of C’s new horse drawing.

The eyes are the best place to start when drawing a living being. The eyes on Mr. Curly were too dark to see on the photo, so I used the computer to lighten and enlarge. (If you can’t see a thing, it’s almost impossible to draw the thing. Duh. You are welcome.)

Eye on the left after enlarging and lightening:

Eye on the right, after lightening and enlarging:

My demonstrations and notes, scanned a little darker than accurate in order for C to be able to read my handwriting, which makes the drawing parts a little too dark. There are many drawbacks to this virtual stuff, but C is a very committed drawing student and an excellent communicator.

I wonder how many of you will unsubscribe to my blog because this type of post is making your eyes cross.

New Virtual Drawing Lesson

Look at this beautiful photo of a horse by my drawing student C. She wants to draw it and I will do my best to help her, through emails.

The first set of instructions was this:

  1. Trace the main parts to simplify the visual information
  2. Copy the tracing onto the drawing paper, rotating directions. Start upside down, then sideways, next other sideways, finally right side up. Each direction will show you different shapes and angles that need to be corrected.
  3. Trace a few more details onto the first tracing.
  4. Add those details to the drawing, remembering to rotate.

This is what C sent to me after finishing those actions.

She is drawing the same size as her printed photo. This means she can scoot the tracing over the top of her drawing to check her accuracy. 

When students draw the exact same size as their photo, they can do this sort of checking. Here are some thoughts about that:

  1. Always force yourself to draw first, BEFORE laying the tracing on top. We all need to exercise our “seeing muscles”, and practice is the only way to learn to see accurately.
  2. When you draw the same size as your photo, you aren’t learning to see proportionately as quickly as if you draw larger or smaller. Sure, you will still have to see how things relate to one another inside the drawing, but you aren’t looking at the whole to learn to think thoughts such as “half is always half” or “a third on my drawing needs to be the same as a third on the photo”.
  3. When you draw the same size as your photo, sometimes you get paralyzed by the thought of changing size.
  4. If you are dependent on drawing the same size as your photo, it is even harder to transition into drawing from real life. Drawing from real life is the hardest way to draw, because you are going from 3 dimensions to 2 dimensions, and every time you slouch a bit or accidentally lean to one side or the other, the image in front of you changes.

Stay tuned. The virtual drawing lesson will continue.


Dithering Over Decisions

Still Here, my upcoming exhibition for the month of April has me dithering about how much is enough, how to prioritize the work ahead, and wishing for the umpteenth time that I had a functional and accurate crystal ball.

When Arts Visalia asked me if I’d move from January 2022 to April 2021, I decided that I would finish 4 of the 5 paintings in progress and not try to add anything else. The fifth could just wait for another opportunity.

This might be finished now.

Because I am painting larger than normal for me, I am not able to guess how long a painting will take to finish. The ones on the easels seemed almost impossibly far from completion. Then suddenly 3 of the 4 looked ready to sign. So, I pulled out #5, because it will be a nice addition.

Maybe there is time to finish this one.


Incrementally closer to completion with each painting session.

Meanwhile, I went through my framed pencil drawings and decided a bit more variety will be good. So, I delivered 3 more drawings to my framer with the usual instructions of “Make them look good and call me when they are ready.” I believe in hiring the best people for the job and then just getting out of their way.

I wonder if Arts Visalia will rethink the decision to hang my work in Gallery 2 and move me into the Main Gallery. I could fill it up. My work could fill both galleries. HEY, ARTS VISALIA, DO YOU READ MY BLOG?

Probably not. Guess I’ll head back to the easels.

Virtual Drawing Lesson 5

Virtual Drawing Student C finished her drawing of the horse, Rocky. She sent me a new photo that I named Mr. Curly, and I have instructed her how to begin.
About starting Mr. Curly:
1. First step is always to decide how big and where on your paper that Mr. Curly will go.
2. Remember to draw a border so that you don’t view the edge of the paper as the edge of your drawing. Margins are necessary for many reasons.
3. Do you have tissue paper so you can trace the main shapes? The purpose of this is to simplify the image in order to get the bare bones laid out on your new paper.
4. If you don’t have tissue paper, you can skip that step. It is a little harder to see the main shapes with all those colors and textures than if you are looking at just an outline on tissue.
5. Remember to look at the drawing (and the tracing or the photo) upside down, sideways, other sideways, and then finally right side up. 
6. Go slowly, draw light, and don’t stop until all the shapes look perfect. Okay, you can stop if you need a break or feel stuck, but don’t begin shading until you have all the outlines down. Remember to draw the dog before you draw the fleas.
7. After it looks perfect, scan and send it to me so I can see if there are any problems with the proportions.
 
P.S. Maybe Mr. Shaggy or just Shaggy would be a more appropriate name. Or how about Lurch?

Virtual Drawing Lesson Thoughts

In working with my drawing student C via email, we discussed the fact that the drawing of her horse Rocky got finished in record time for her. She is such a good thinker and clear communicator that I decided to share what we discussed. These are her conclusions about finishing quickly and my thoughts.
C’s drawing table is where she can work any time she passes by without having to set things up.
It is so helpful to have an art project be accessible so it isn’t a project unto itself just to set up. 
C felt dependent on my help when in class and a little intimidated to just dive on in.
I need to find a way to encourage my students to be more independent so they don’t wait for me to tell them each step; at the same time, I understand why they wait for instruction, because who wants to erase?? 
C felt a little intimidated about being with people who are more advanced than she is.
It takes awhile for people to realize that their classmates are super encouraging and that all of us started at the beginning, not suddenly arrived as accomplished artists. I sometimes purposely bring something ugly and early to show my students so they won’t feel embarrassed by their own early origins. My students all make better first drawings than I drew AFTER I started accepting commissions. 
C had confidence drawing horses, a subject that she has painted several times.
She is right about having more confidence when drawing a familiar subject. I often remind my students to pick something they love, because they will be staring at it for L O N G time.
 
I love that my drawing students become friends, love listening to them all get to know each other, love learning from them on a variety of topics. Sometimes I wonder if it would be more efficient to ask everyone to stop talking and focus. Then I remember being in a colored pencil workshop when the very unpleasant instructor shouted, “QUIET! NO TALKING!” and I never want to do that. So, we’ll just keep on as things are, and I will continue looking for ways to encourage independence.

Real Mail

Back in the olden days, people bought things from me in person and wrote personal checks. I collected addresses from these transactions and built a mailing list of 1000 names. Whenever I had a big event, I would get postcards printed and then hand address all 1000. Yeppers, by hand.

Kaweah Post Office #4, pencil and colored pencil, unframed, 11×14″, $275

Printing and postage costs became prohibitive, and big events became fewer, winding down to a big fat nothing last year.

For April’s show Still Here, Arts Visalia will have postcards printed and mailed. This means I have to provide a mailing list, so I pulled out my address files.

It was sobering to see the number of people who have died, moved, and divorced. It was also quite astonishing to realize that many were simply names and addresses, with no memory of how we met or what they bought. 

My list is now about 250 names, all of whom I can identify. If you would like to receive a real paper postcard with a real stamp in your real mailbox, use the Contact button on my website or email me (spelled out here to confound the robots) cabinart at cabinart dot net. The gallery has promised to not use the addresses unless someone requests to be added to their list.

Virtual Drawing Lesson 4

C sent me her drawing with a list of 5 questions. This time I was more orderly, instead of making little patches of topics all over the paper. She only had one area that I needed to demonstrate, but I handwrote the entire sheet of instructions anyway. Then I realized that no one else would want to read all that scribbling.

Here is her drawing:

And here is a more concise list of instructions.

  1. There are a couple of scratches on the drawing. These can be fixed with a super sharp 2H or lighter pencil, working under a magnifying glass. (Yes, it is difficult – I can do this, and you may address me as “Dr. Pencil”.)
  2. Her decision to make the horse’s upper lip look more like reality than the photo was a good decision. (You may address me as “The Mayor of Realville”).
  3. She circled an area of the chest and said it didn’t look right to her. I told her it is because the strokes are too long, and I demonstrated those, scanned them, and emailed the scan. 
  4. When I spray-fix my drawings, I use Blair Matte Spray Fixative to keep my drawings from smearing. Beware: it alters the colors of some colored pencils (had a terrible spray fix accident once, still scarred), and I always try a little squirt first to make sure the nozzle isn’t clogged. 
  5. The best paper for my style of drawing is Strathmore (brand) Bristol (weight) Smooth (surface) 400 Series (quality).

I provide most of the paper to my drawing students in person. There are many things that are better about taking drawing lessons in person, but we are doing the best we can with this. I think C is doing a great job in communicating clearly, working on her own, and encouraging her reluctant instructor to push through her annoyance with technology.