The last time I did a large mural, I learned a boatload of information about the process, particularly about projecting it onto the wall. It was so exciting to be projecting, and it was overwhelming to have so much eager help, that last time I didn’t really think through. This time, I thought I had it all figured out. My plan was to mark the wall in the same number of increments as I have transparencies.

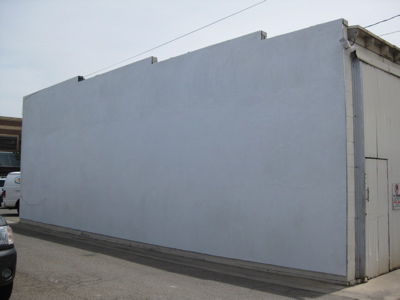
Yesterday I visited the wall, which has been both plastered (very smoothly – wow, excellent!) and primed. Since I planned for a 40′ length of wall, it seemed right to just mark it off in 10′ sections. Then, my more cautious self decided to measure the length just to be sure. Good thing – it is 45′! I have 4 transparencies, so I divided 45 by 4 and marked the wall in 11′-3″ segments. Then, I thought I’d better check the height, since I planned for 14′. At its highest, it is 15′-6″! This brings me to my next big lesson – MEASURE IT YOURSELF NEXT TIME BEFORE DESIGNING AND BIDDING! Today my plan is to test my overhead projector and to mess around with the math to see if my transparencies can be adjusted to fit the actual wall size.